How to integrate Facebook authentication in React Native
Introduction
In this shot, we’ll learn to integrate Facebook authentication in React Native for the Android version of the application.
Installation
We use the code below to create a new React Native application.
npx react-native init authtutorial
cd authtutorial
We go to our Firebase dashboard and create an android, and an iOS application named com.authtutorial. We can choose any name for this. we get two files called googleservices.json for android and googleServices-Info.plist for iOS. We need these two files to integrate Firebase services in our React Native application.
We enable Facebook authentication in our Firebase dashboard.
Installation for Android
We place the googleservices.json file inside the android>app folder. We follow the below steps to initialize our Firebase in the Android version:
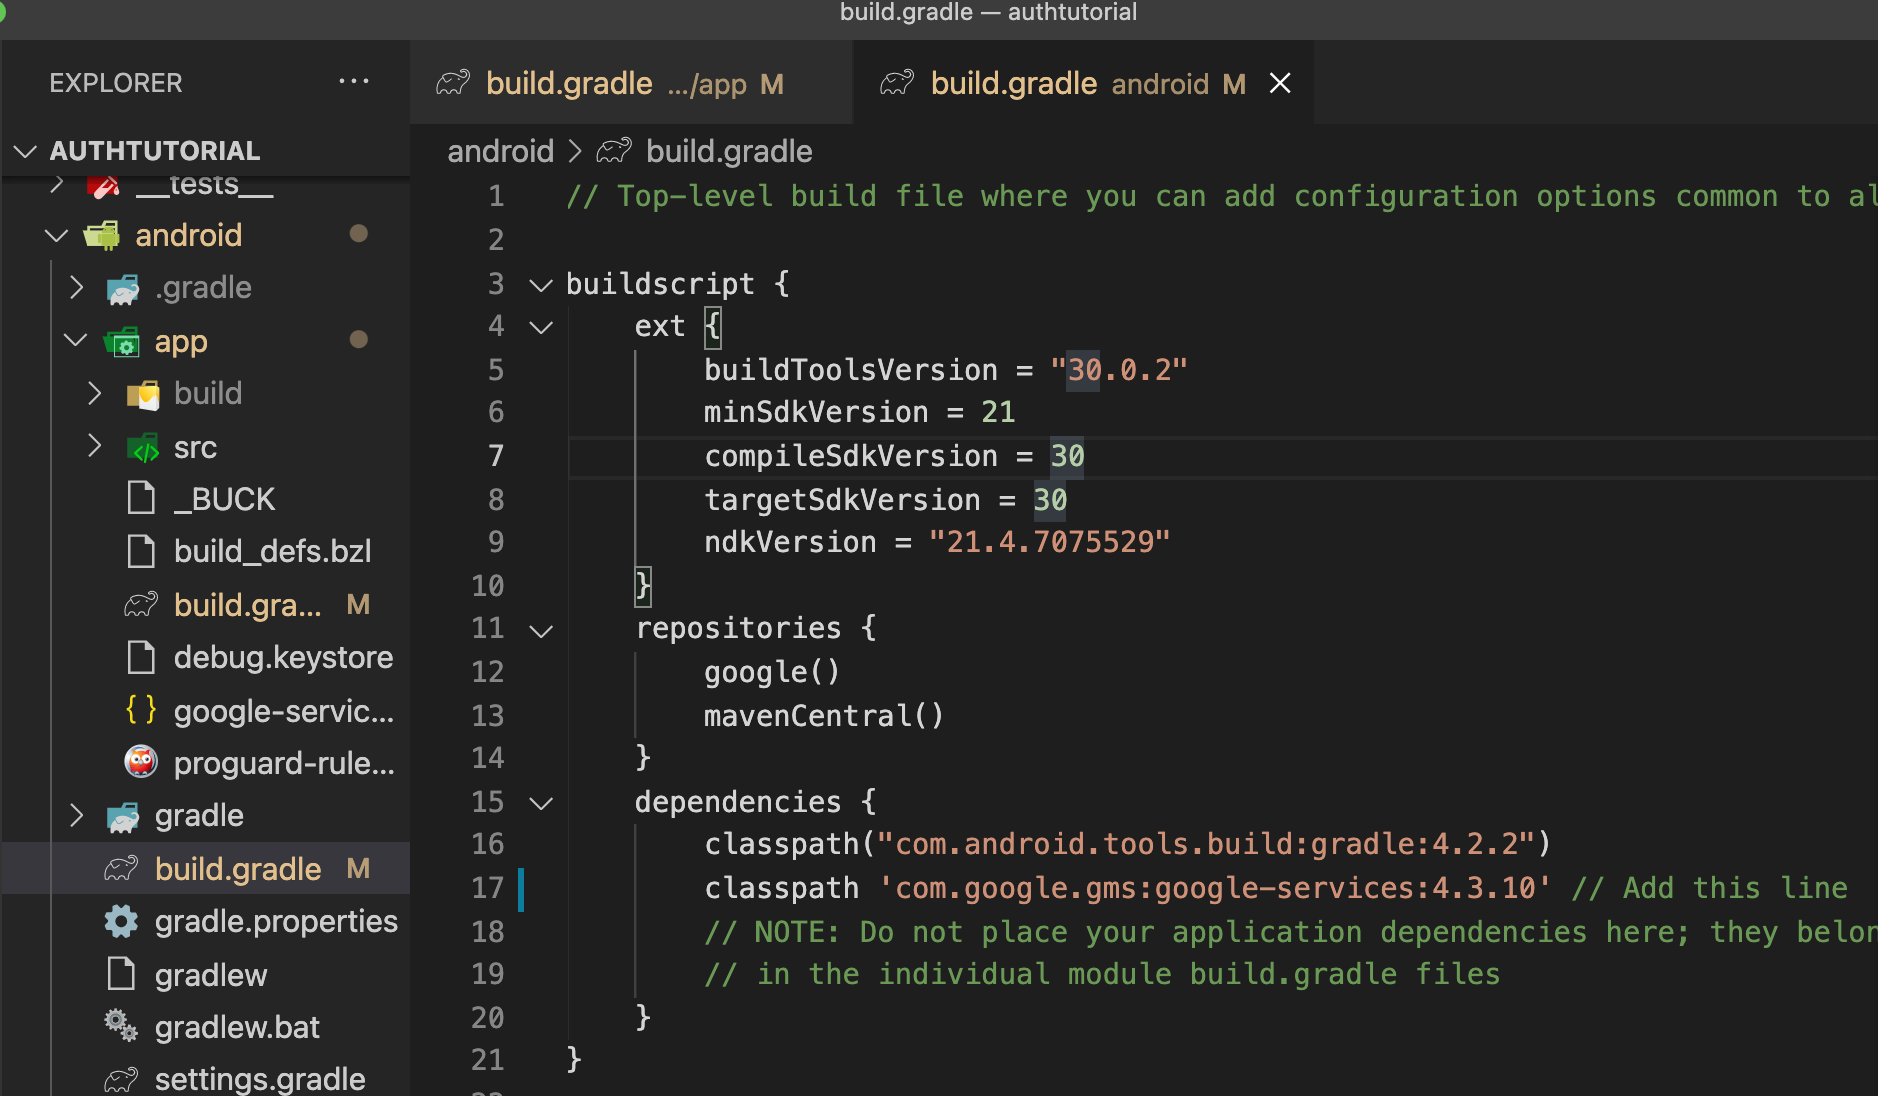
- We add the code below in
build.gradle.
classpath 'com.google.gms:google-services:4.3.10'
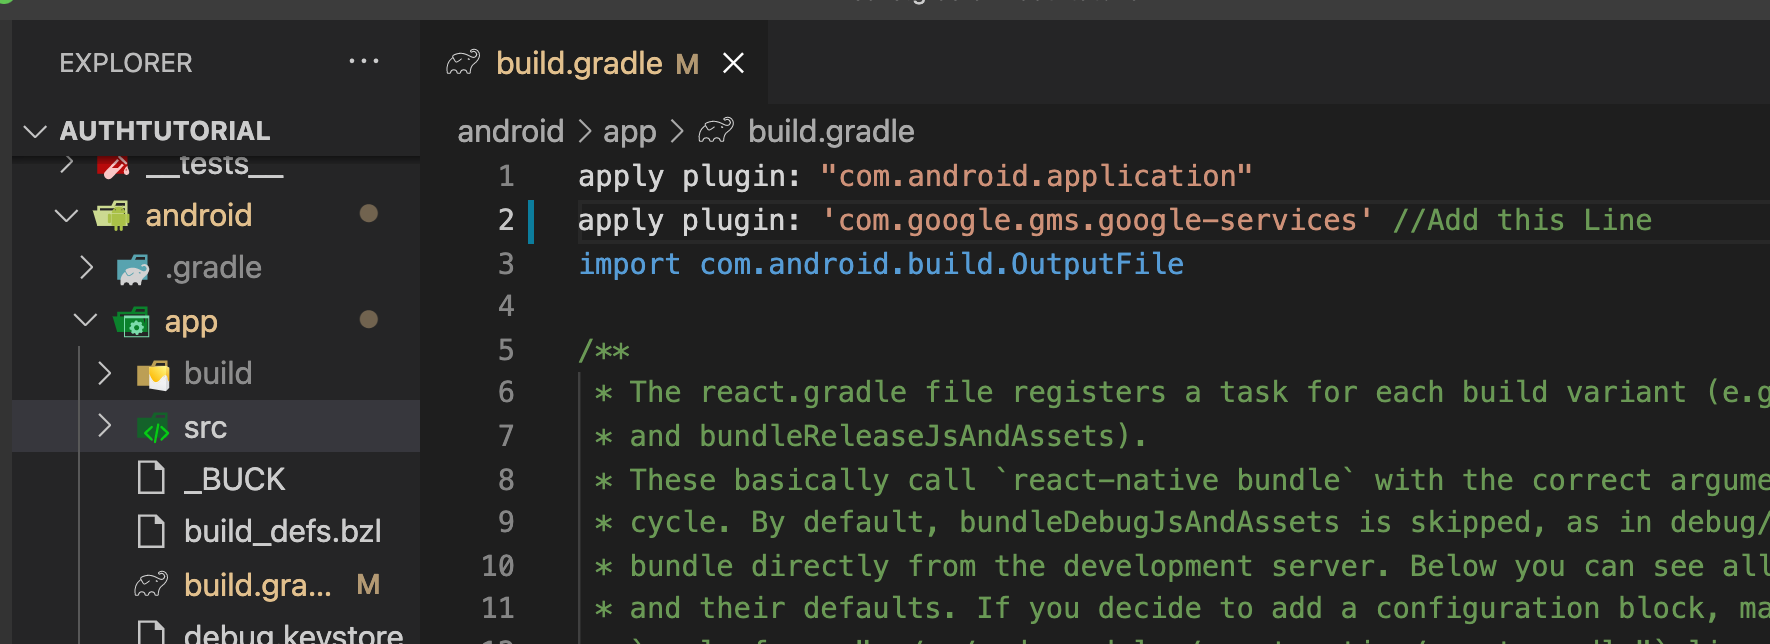
- We add the code below in
build.gradlein the application folder.
apply plugin: 'com.google.gms.google-services'
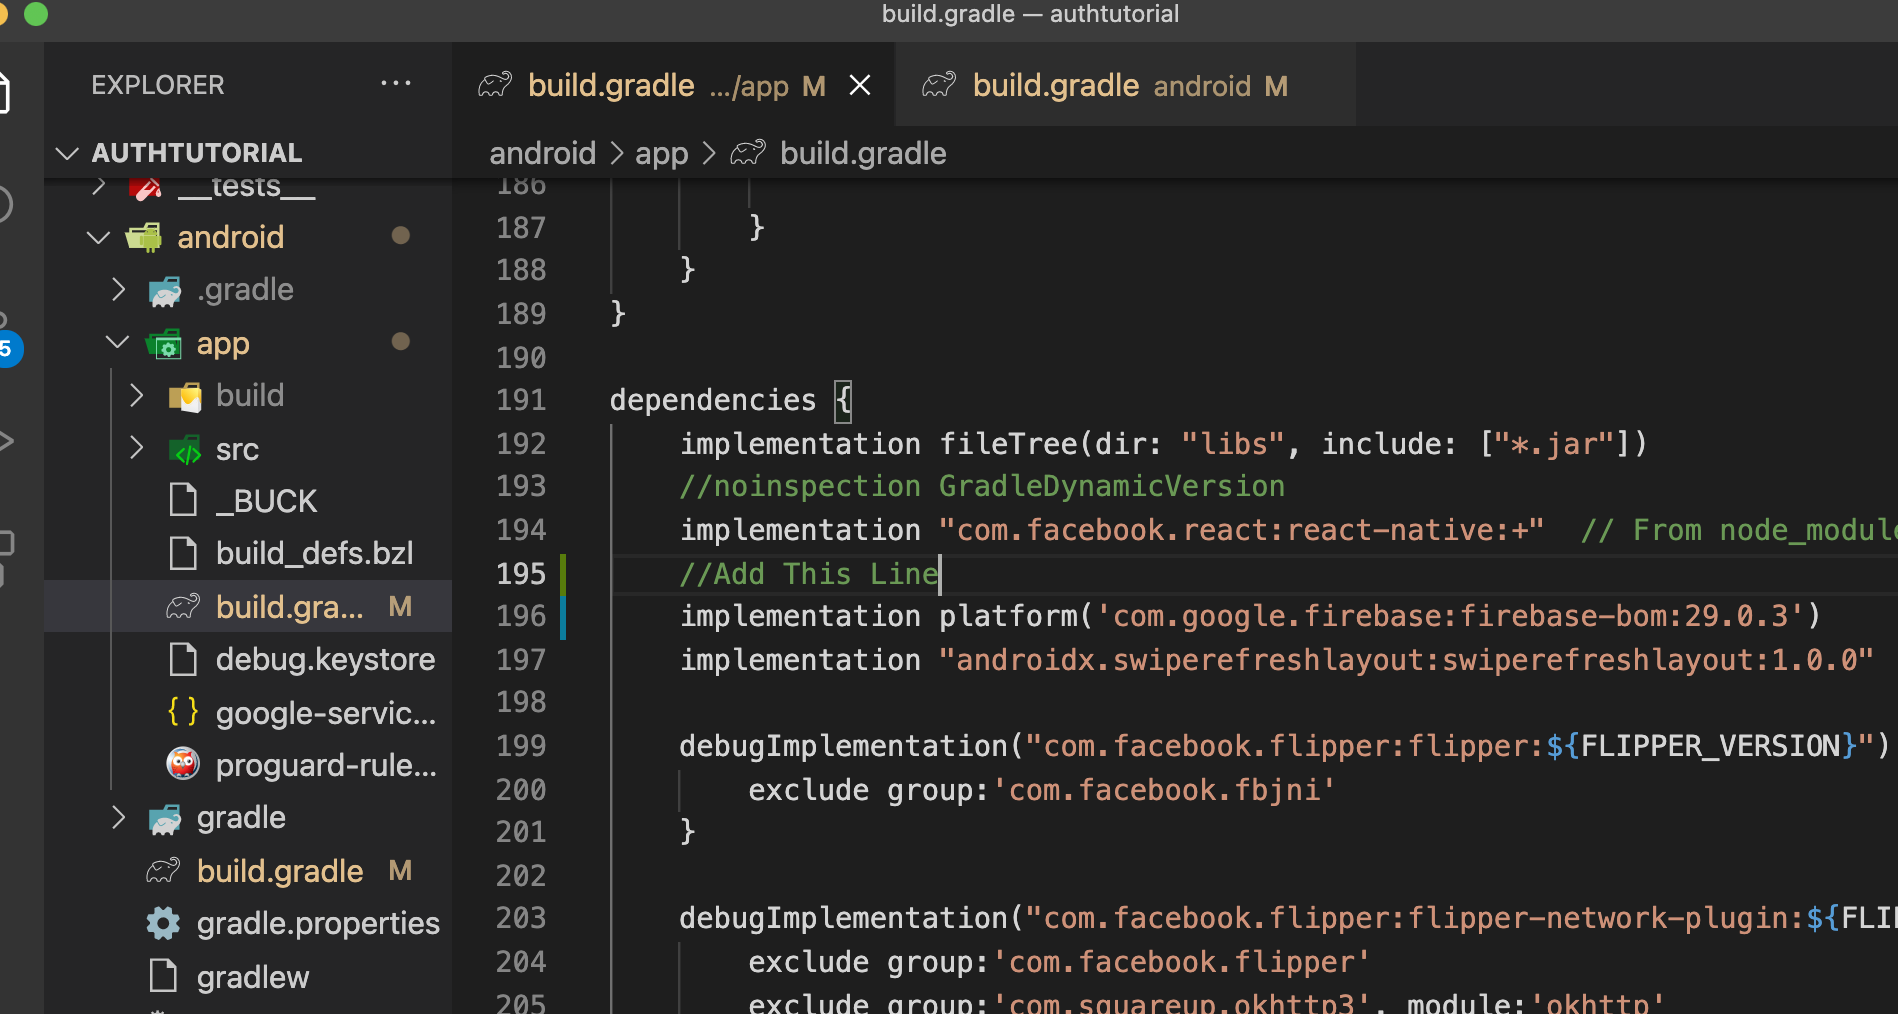
- We add the code below in dependencies in the same file.
dependencies {
  // Import the Firebase BoM
  implementation platform('com.google.firebase:firebase-bom:29.0.3')
Android
After we install Firebase, we use a tool called KeyStore Explorer. We can download this application using the link below.
https://keystore-explorer.org/
After we install this tool, we use it to open debug.keystore in the android>app folder. The password of the file is “android”. Once we have the access to the file, we copy the SHA-1 key and paste it into the Firebase dashboard.
The path where you can paste this SHA-1 fingerprint can be accessed by following the steps below.
We click on the gear icon. Next, we click “project settings.” In the general tab, we scroll down and click on our android app. Then, we click “Add Fingerprint” and paste the SHA-1 value.
Its advisable to create a new debug.keystore and make an application with it so our debug key is unique.
Click the “authentication” tab in the Firebase dashboard.
If we follow these steps correctly, we can move into the code part.
Next, we install the required npm packages from the terminal.
npm install --save @react-native-firebase/app @react-native-firebase/auth react-native-fbsdk-next
Next, we follow the below steps to enable Facebook login to get our React Native app to work on Android.
We create a developer account on Facebook to enable login to work on our app.
We use the link below to create a developer account.
https://developers.facebook.com/
After we create the account, we’ll create a new application with our application’s name in it. Here we have com.authtutorial.
After creating a new application, we’ll get a unique id called “app id”. We’ll copy it.
- We’ll go to
android folder>app>src>main>res>values>strings.xml
We’ll paste the id in this folder, as shown below.
<resources>
    <string name="app_name">authtutorial</string>
    <string name="facebook_app_id">226381906331184</string>
</resources>
- In this step, we go to
androidManifest.xmland add the line of code below at the bottom of the file near the ending tag of the application.
<meta-data android:name="com.facebook.sdk.ApplicationId" android:value="@string/facebook_app_id"/>
We’re now done with the configuration.
We add the code below to integrate Facebook login to our application in App.js.
import React, {useState, useEffect} from 'react';import {SafeAreaView, Text, TouchableOpacity, View} from 'react-native';import auth from '@react-native-firebase/auth';import {LoginManager, AccessToken} from 'react-native-fbsdk-next';const App = () => {const [user, setUser] = useState(null);async function onFacebookButtonPress() {const result = await LoginManager.logInWithPermissions(['public_profile','email',]);if (result.isCancelled) {throw 'User cancelled the login process';}const data = await AccessToken.getCurrentAccessToken();if (!data) {throw 'Something went wrong obtaining access token';}const facebookCredential = auth.FacebookAuthProvider.credential(data.accessToken,);return auth().signInWithCredential(facebookCredential);}const onAuthStateChanged = async userAuth => {if (!userAuth) {return;}if (userAuth) {console.log(userAuth);setUser(userAuth);}return () => userReference();};useEffect(() => {const subscriber = auth().onAuthStateChanged(onAuthStateChanged);return () => {subscriber;};}, []);const signOut = async () => {auth().signOut();setUser(null);return () => userReference();};return (<SafeAreaView style={{alignItems: 'center', flex: 1, marginTop: 100}}><View style={{margin: 10}}><Text>FaceBook Sign In Tutorial</Text></View><View style={{margin: 10}}>{user === null && (<TouchableOpacity onPress={onFacebookButtonPress} style={{alignItems: 'center'}}><Text>Login With FaceBook</Text></TouchableOpacity>)}</View>{user !== null && (<View style={{margin: 10}}><Text style={{margin: 10}}>{user.displayName}</Text><TouchableOpacity onPress={signOut} style={{alignItems: 'center'}}><Text>Sign Out</Text></TouchableOpacity></View>)}</SafeAreaView>);};export default App;
We create a function to sign in the user and once we’re successfully signed in, we create a function that listens to the authChanges.
We also create a function that enables the user to sign out from Facebook.
Finally, we run the code below.
npm run android