How to deploy a GitHub PHP app to Heroku
You’ve been building your app and hosting your source code on GitHub. Now you want to ship it to the world so that people can use it. You have plenty of solutions to do so.
In this shot, we will learn how to deploy an app to Heroku, which is a popular platform as a service (PaaS).
Prerequisites
You will need the following:
Getting started with Heroku
Here are the steps you need to follow to work with Heroku:
- Create a new application.
- Choose a deployment method.
- Extend features with the help of add-ons such as data storage, monitoring, etcetera.
Let’s get started.
Create a new application
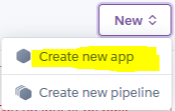
To start, click the “New” button and then click “Create new app” to create a new application.You’ll be given a form. Fill it andclick the “Create app” button once finished.
Choose a deployment method
Heroku offers developers many deployment methods. In this course, we’re going to use the GitHub method because it makes the development and maintenance process smooth. You can focus on new features using the git workflow.
Click “GitHub” in the deployment method. Next, type the name of your project repository. Ours is called is crud-php-mysql. Click the “Connect” button.
Note: If you have more than one branch, you must specify the main deploy branch.
Your repository is now connected to Heroku.
In the “Automatic deploys” section, click “Enable Automatic deploys”. Once you make a change in your code and push it to GitHub, Heroku will automatically deploy it.
Let’s manually deploy a branch by clicking “Deploy branch” under the “Manual deploy” section.
Click the “View” button to see our application.
If you try to click other links, you’ll get errors because they require a database connection. Let’s see how to fix these issues.
Add the MySQL engine to our application
Heroku does not have a database system already set by default. Because our application depends on a database, we have to install a Heroku database “addon”.
From the dashboard of our newly created app, click “Resources”. In the search bar, type “MySQL” and select “ClearDBMySQL”.
Make sure that the free version, Ignite - Free, is selected, and click the “Provision” button.
Once done with the provision, you can go to the setting of your app to get the database information. Click the “Reveal Config” button, and you’ll be given the CLEARDB_DATABASE_URL which looks like this:
Test remote data from CLI
Let’s try to connect to the database from the CLI.
As you can see in the image above, we’ve successfully connected, and we can even see the database.
Populate the remote database
In model/config.php, let’s add information about the remote database.
$host       = "us-cdbr-east-02.cleardb.com";
$username   = "your remote db username";
$password   = "your secrete";
$dbname     = "your db name";

if ($_SERVER['HTTP_HOST'] == 'localhost') {
  $host       = "localhost";
  $username   = "root";
  $password   = "";
  $dbname     = "tracker";
}

$dsn        = "mysql:host=$host;dbname=$dbname";
$options    = array(
  PDO::ATTR_ERRMODE => PDO::ERRMODE_EXCEPTION
);
Make sure you use the information concerning your remote database. Notice that we’ve used an if statement so that we’re able to use the same file for both the localhost and remote database configuration.
In data/install.php, add this before you start executing queries:
if ($_SERVER['HTTP_HOST'] != 'localhost') {
        $sql_db = 'USE ' . $dbname . ';';
    }
For the remote database, we don’t need to create, but we can use the one the provided to us.
Save the new changes, commit, and push to your remote GitHub repository.
You can now run the installation script to complete the setup. Open a browser and use the following link, replacing your-app-name with your actual Heroku app name:
https://your-app-name.herokuapp.com/data/install.php
This link will initialize the database connection using the production credentials. If everything is configured correctly, the script will execute and establish the live database connection on Heroku.
After running the script, if no errors occur, you’ll see a success message similar to the one displayed in your localhost setup.
Congratulations! Your site is now live and connected to the database.

