How to create UI design in Android
User Interface(UI) Design In Android
User Interface (UI) design in Android is a graphical representation of views displayed on a smartphone or tablet. It allows users to interact with the features, functions, and contents of the application.
To design UI, you need no prior programming knowledge, although it is nice to have web developing skills or programming skills.
Every application has a user interface with which users can interact. Android provides various
Components used for Android application
There are many components for the Android application. Let’s consider a few of them here:
-
Main Action Bar (MAR)
-
Split Action Bar (SAB)
-
Content Area
These play a significant role while developing a complex Android application.
Views components
What is View?
Views are used to customize User Interface (UI) design. A view is considered a building block for a proper User Interface created from the view class.
A view can also be defined as a small rectangular box in Android development that responds to the user inputs, for example, buttons, checkboxes, etc. Basically, a View is what a user sees and interacts with.
View group is an invisible container of other views, such as child view and other view groups. This view class is a super class of all the
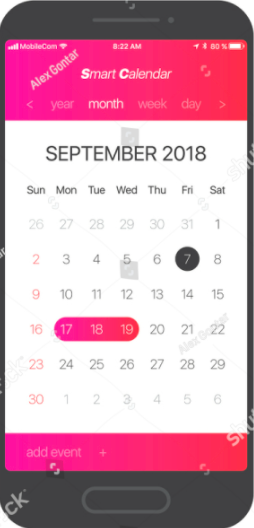
Figure 1.0. A simple UI Design
In the Android studio, we commonly use a view called “edit text and images”. Images are classified as widgets used to create an interactive UI component, such as buttons, text fields, etc.
Layout as a subclass of View group
The Layout defines the visual structures of the UI of user application. All elements in the layout are built using a hierarchy of views and view group object.
The layout can be declared through a programming language, or through a simple XML layout file located in the resource layout folder of any project you work on. Android provides a straightforward XML vocabulary that corresponds to the view class and subclasses, such as those present for widget and layout. Due to this, the layout can be treated.
Layouts are kept in the folder called resources. Android studio creates a default XML layout file in the resources layout folder that is extremely useful if you know the basic at the time of compiling.
Advantages of XML Layout
There are many advantages of XML layout. These are:
- It is an immensely popular and widely used format.
- It helps provide the UI component from the logic, which in turn provides the flexibility to change one component without affecting the other.
- It is much easier to generate than writing direct code. It allows an easier drag and drop to generate interfaces for the Android application.
Types of layout
Android provides a number of layouts, that provide different views, to use in its applications.
The following are considered the standard layouts or view groups used in Android applications.
- Linear layout: It is used to arrange views in a single column or row. It is further divided into a vertical or horizontal linear layout.
<LinearLayout xmlns:android="http://schemas.android.com/apk/res/android"
android:layout_width="match_parent"
android:layout_height="match_parent"
android:orientation="vertical" >
 <Button
android:id="@+id/button"
android:layout_width="wrap_content"
android:layout_height="wrap_content"
android:text="Hello, I am a Button" />
</LinearLayout>
- Frame layout: It is a placeholder on the screen used to display a single screen.
<FrameLayout xmlns:android="http://schemas.android.com/apk/res/android"
android:layout_width="match_parent"
android:layout_height="match_parent"
android:orientation="vertical" >
 <Button
android:id="@+id/button"
android:layout_width="wrap_content"
android:layout_height="wrap_content"
android:text="Hello, I am a Button" />
</FrameLayout>
- Relative layout: It enables you to specify how child views are positioned to each other.
<RelativeLayout xmlns:android="http://schemas.android.com/apk/res/android"
android:layout_width="match_parent"
android:layout_height="match_parent"
>
 <Button
android:id="@+id/button"
android:layout_width="wrap_content"
android:layout_height="wrap_content"
android:text="Hello, I am a Button" />
</RelativeLayout>
- Table layout: It groups the views into rows and columns.
<TableLayout xmlns:android="http://schemas.android.com/apk/res/android"
android:layout_width="match_parent"
android:layout_height="match_parent"
>
 <Button
android:id="@+id/button"
android:layout_width="wrap_content"
android:layout_height="wrap_content"
android:text="Hello, I am a Button" />
</TableLayout>
- Constraint layout: It provides you with adaptable and flexible ways to create views for your applications.
<androidx.constraintlayout.widget.ConstraintLayout xmlns:android="http://schemas.android.com/apk/res/android"
android:layout_width="match_parent"
android:layout_height="match_parent"

 <TextView
android:id="@+id/text"
android:layout_width="wrap_content"
android:layout_height="wrap_content"
android:text="Hello, I am a TextView" />

</androidx.constraintlayout.widget.ConstraintLayout>
Unit of measurement
There are a number of measurement units used in Android studio.
- DP – Density independent pixel
- SP – Scale independent pixel
- PX – Pixel
- PT
Steps to follow in UI Design
- Download Android studio from your browser.
- Install Android studio.
- Open Android studio.
- Create a new project and select project type.
- Give it a name of your choice.
- Click on the resources folder.
- Click on the layout folder and begin to design your UI.