How to build a voice to text app in React
React is one of the most popular JavaScript framework libraries when it comes to web applications. It is a powerful and heavyweight library destined for the web development environment. React enables developers to create large-scale web applications that can update the data in the DOM without having to reload the page. The core objective of React is to make web application development simple, fast, and scalable.
In this tutorial, we are going to learn how to implement a voice note application in React ecosystem using the SpeechRecognition JavaScript interface. This interface enables us to listen to speech through the browser microphone and recognize each speech and translate them to text. And, we are just going to do that. The idea is to listen to the speech, recognize it, translate the speech, and display it in the UI as a note. This will also involve starting and stopping the recording of speech as well as saving the voice notes.
Let’s get started!
Creating a React App
First, we are going to create a new React App project. For that, we need to run the following command in the required local directory:
npx create-react-app voiceNote
After the successful setup of the project, we can run the project by running the following command:
npm run start
// or
yarn start
After the successful build, a browser window will open up showing the following result:
Setting up the starter template
Now, we are going to set up our starter UI template. It will include two sections:
- T he Upper section will have controls to record to voice and convert it to text and display it. There will be buttons to start and stop the recording as well as save the recorded text.
- The lower section will be used to display the stored voice notes. We are going to implement the entire UI in App.js file.
The overall code for this is provided in the code snippet below:
import React, { useState, useEffect } from "react";
import "./index.css";

function App() {

  return (
    <>
      <h1>Record Voice Notes</h1>
      <div>
        <div className="noteContainer">
          <h2>Record Note Here</h2>
          <button className="button">
            Save
          </button>
          <button >
            Start/Stop
          </button>
        </div>
        <div className="noteContainer">
          <h2>Notes Store</h2>
        </div>
      </div>
    </>
  );
}

export default App;
The required CSS styles are provided in the code snippet below:
.noteContainer {
  border: 1px solid grey;
  min-height: 15rem;
  margin: 10px;
  padding: 10px;
  border-radius: 5px;
}

button {
  margin: 5px;
}
Hence, we will get the result as displayed in the screenshot below:
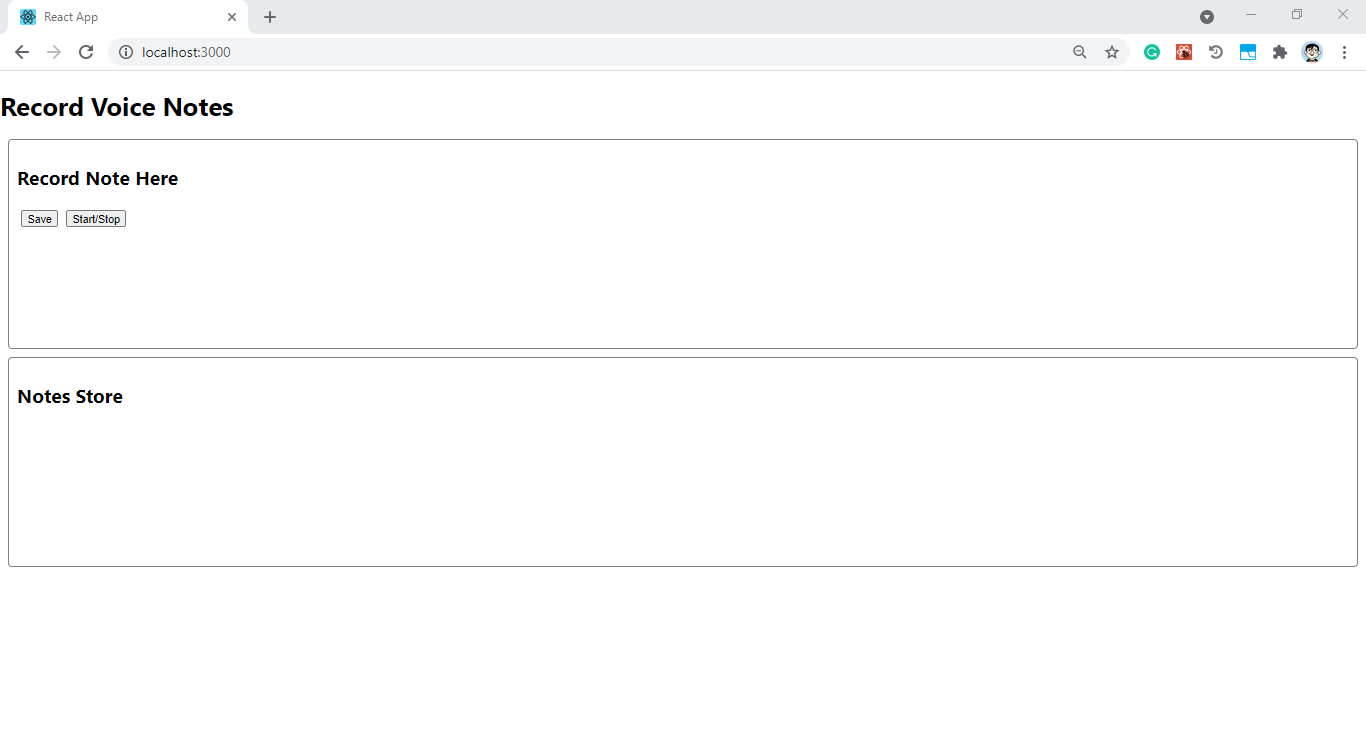
As you mat notice, there are two sections. The upper box to record the voice note and the lower box to display the saved notes after the note has been recorded.
Initialize states
Now, we are going to define the state variables required for this overall task to take place. For that, we are going to make use of the useState hook. The useState hook defines the state providing two values. One is the state itself and other is the function to update that state. The initialization value can be defined as a parameter of the useState hook. The required state variables are provided in the code snippet below:
const [isRecording, setisRecording] = useState(false);
const [note, setNote] = useState(null);
const [notesStore, setnotesStore] = useState([]);
Here, we have defined three state variables:
isRecording: To handle the recording state of the microphone whether it id on or off. The initial value is boolean false.
note: To take in the recorded voice note and display it as we record. The initial value is null.
notesStore: To hold the notes that have been saved. It is initialized as an array state.
Each of these variables have their own respective function for updating themselves.
Initializing Microphone
Now, we are going to initialize the microphone that will listen to the speech and convert it into text notes. For that, we are going to use a SpeechRecognition interface provided by the JavaScript window object that will work on the Chrome browser only. SpeechRecognition is the controller interface for the recognition service; it also handles the SpeechRecognitionEvent sent from the recognition service. We are going to initialize this service in the microphone constant as shown in the code snippet below:
const SpeechRecognition =
  window.SpeechRecognition || window.webkitSpeechRecognition;
const microphone = new SpeechRecognition();

microphone.continuous = true;
microphone.interimResults = true;
microphone.lang = "en-US";
Then, we have configured some properties of the microphone:
microphone.continuous: This property controls the return of continuous results for each recognition or only a single result. The value defaults to false, which returns only single recognitions.
microphone.interimResults: This property controls whether or not interim results should be returned. The results that are not yet final are called interim results.
microphone.lang: It returns and sets the language of the current SpeechRecognition interface.
Implementing Record and Save Function
Now, we are going to define two functions that will be used to record and save a voice note. One is startRecordController, which will be used to listen to the speech and then convert the result to text and set the note state to display in the screen. The other is storeNote function, which will be used to store the recorded voice notes. To store the note, we are using the setnotesStore function provided by respective useState hook of the state. The code snippet below only shows the implementation of the storeNote function as we are going to implement startRecordController function later:
const startRecordController = () => {
  };

const storeNote = () => {
  setnotesStore([...notesStore, note]);
  setNote("");
};
Now, we need to assign these functions to their respective buttons so that the function is triggered once the buttons are clicked:
return (
  <>
    <h1>Record Voice Notes</h1>
    <div>
      <div className="noteContainer">
        <h2>Record Note Here</h2>
        {isRecording ? <span>Recording... </span> : <span>Stopped </span>}
        <button className="button" onClick={storeNote} disabled={!note}>
          Save
        </button>
        <button onClick={() => setisRecording((prevState) => !prevState)}>
          Start/Stop
        </button>
        <p>{note}</p>
      </div>
      <div className="noteContainer">
        <h2>Notes Store</h2>
      </div>
    </div>
  </>
);
Here, we have also set the Recording and Recording Stopped text conditionally based on the isRecording state. This way, users will know that the recording as started or stopped.
Handle Microphone Recording
Now, coming to the main function that is startRecordingController. First, we need to configure the starting and stopping of recording based on the isRecording state.
If the isRecording state is false, we can start the recording using the start() method provided by the microphone instance. If the isRecording state is true, we can stop the recording using the stop() method. We can track the conversion of voice to text using the onresult function that returns an event parameter. The event parameter holds the result of continuous recognition of speech, which can be stored in an array. The array can get be traversed using the map function to get the resulting text of each recognition. Then, using the join method, we can concatenate the results together and store them in the note state variable. Hence, the note state will be updated and displayed on the Upper box. We can use the onerror method to log the errors (if any). The overall implementation of this controller function is provided in the code snippet below:
const startRecordController = () => {
  if (isRecording) {
    microphone.start();
    microphone.onend = () => {
      console.log("continue..");
      microphone.start();
    };
  } else {
    microphone.stop();
    microphone.onend = () => {
      console.log("Stopped microphone on Click");
    };
  }
  microphone.onstart = () => {
    console.log("microphones on");
  };

  microphone.onresult = (event) => {
    const recordingResult = Array.from(event.results)
      .map((result) => result[0])
      .map((result) => result.transcript)
      .join("");
    console.log(recordingResult);
    setNote(recordingResult);
    microphone.onerror = (event) => {
      console.log(event.error);
    };
  };
};
Now, we need to run this function when the app mounts to the screen as well as each time the value of isRecording state changes. For that, we can make use of the useEffect hook. Hence, we need to call our startRecordController function inside the useEffect hook and apply a controlling parameter as well. This is shown in the code snippet below:
useEffect(() => {
  startRecordController();
}, [isRecording]);
Everything is ready now; we just have to display the stored notes. For that, we can map through the notesStore array state and display each stored note in the Lower box section. The template code for this is provided in the code snippet below:
return (
    <>
      <h1>Record Voice Notes</h1>
      <div>
        <div className="noteContainer">
          <h2>Record Note Here</h2>
          {isRecording ? <span>Recording... </span> : <span>Stopped </span>}
          <button className="button" onClick={storeNote} disabled={!note}>
            Save
          </button>
          <button onClick={() => setisRecording((prevState) => !prevState)}>
            Start/Stop
          </button>
          <p>{note}</p>
        </div>
        <div className="noteContainer">
          <h2>Notes Store</h2>
          **{notesStore.map((note) => (
            <p key={note}>{note}</p>
          ))}**
        </div>
      </div>
    </>
  );
Now we can try and record the voice notes.
Note: the implementation and the demo will only work on Chrome browser as SpeechRecognition interface is built for it – it will not work on any other browsers. Hence, we need to run the project as well as demo in the Chrome browser for it to work properly.
Conclusion
The main objective of this tutorial was to implement a voice note app in React programming environment. The overall implementation was simple enough along with the UI. The tutorial provides the basic use of the SpeechRecognition interface to initialize and use the microphone service from the Chrome browser. The use of two essential React hooks, useState and useEffect, was also properly demonstrated. We learned how to set up and configure the microphone properties as well as use the basic microphone methods to make voice recognition and translation to text possible. This step-by-step implementation will make it easy for React beginners to grasp the concept and use it to implement their own speech recognition React applications.